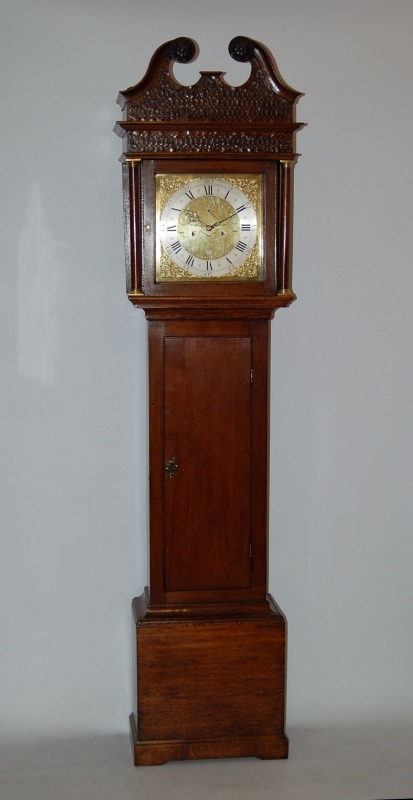
A truly exquisite and very rare Chippendale style antique mahogany 8 day arched brass silvered faced, spring driven granddaughter clock.
,
The Westminster Chime 3 train quarter striking movement of 8 day duration, striking on various gongs, with wood rod pendulum.
The beautiful colour mahogany case has a lovely patina and throughout the case has lovely fine quality features. Exemplary case features on top of reeded quarter columns and brick work to case. Beautiful hood design with swan neck pediments. One of the finest granddaughter cases you will ever see.
The dial with chapter ring and rinf with Tempus Fugit to the arch. Stunning engraving to the brass silvered dial.
The pictures do not do this little beauty justice, it is a fantastic example all round.
Showing here one of the finest provincial antique clock you can find. A stunning oak grandfather clock by Edward Bilbie of Chewstoke. This clock is listed in the Bilbie book. The 8 day movement with square brass dial with chapter ring and spandrels. Also with finely polished and engraved centre. Additionally subsidiary seconds and calendar features.
The movement of high quality striking the hours on a single bell. C1780
The cabinet of lovely colour and patination. Together with superb fretwork to below the elegant swan neck pediments. Long trunk door and the clock standing on a single plinth.
A stunning flame mahogany veneered Regulator Clock.Showing Jackman Newport I. W. engraved to the dial. The fine quality 8 day movement with Harrison’s maintaining power and dead-beat escapement. Furthermore lovely mercury compensated pendulum and separate engraved beat plaque scale.
The lovely C1860 up and over designed case with glazed front door and side section. Fine fretwork decoration to below the dial section. To sum up a very collectable and good size precision timepiece.
Morris Jackman, watchmaker and jeweller. Situated at 110 St. James Street from 1852 to 1886. He was also a silversmith and had a “musical instrument depot”.
From the records he is born in 1824 and died in 1903.
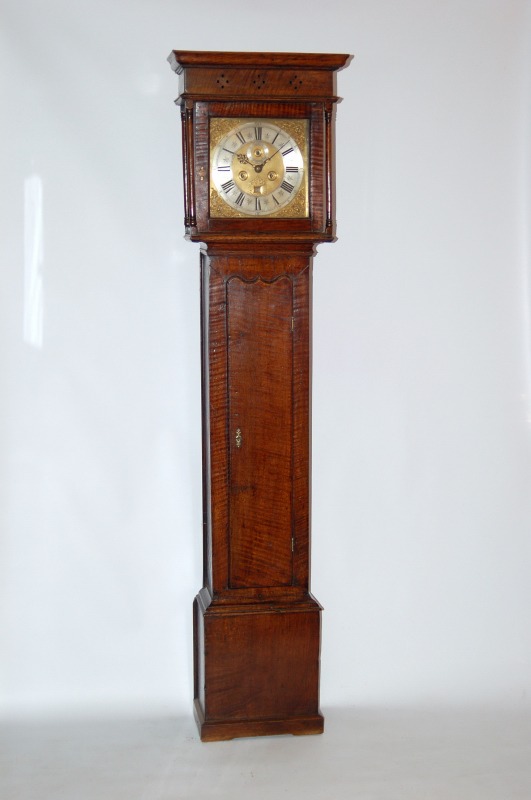
A lovely early 18th century 8 day oak grandfather clock. Together with a superb square brass dial signed Francis Robinson of Northampton. The dial with chapter ring and spandrels. Also with finely matted and engraved centre. Furthermore the lovely early feature of inside quarter divisions and ringed winding holes.
High quality movement striking the hours on a single bell.
The case of the finest colour and patination. With single plinth and shaped top to the trunk door. Rare mouldings adorned to the side of the case. Holes drilled to the hood to let the sound of the bell out. To sum up a very collectible early clock. The maker is probably related to Francis Robinson of London. He was a famous maker and Master of the Clockmaker’s Company.
Setting up your ‘Antique Grandfather / Longcase & Bracket Clock’ at Home
Congratulations on your purchase of a Longcase clock from Pendulum of Mayfair Ltd / Coppelia Antiques. Given proper care and conditions your Longcase clock should give many years reliable service.
1) Winding:
’30Hr’ clocks are generally wound with a rope or chain. This should be done once per day.
‘8 Day’ clocks may either have one weight (typically regulator clocks) or two/three weights. All weights are to be wound by inserting the correct size of key on to the winding arbour. Your clock should arrive unwound, so on winding, the lines should follow the grooves in the barrel (if applicable) ‘8-day’ clocks are usually wound clockwise
‘Month’ duration clocks typically as above but since these clocks have an extra wheel in the train they are generally wound anti-clockwise.
2) Time:
When setting the time never move the hands backwards. If you move the clock hands backwards past a striking section you may cause damage to the movement. Always let the clock strike each hour/quarter etc when setting the time. It is also a good idea to wind the clock prior to setting the time and starting the clock.
3) Calendar:
As the clocks allow for 31 days per month, when there is less than 31 days, you need to adjust the calendar. Depending on the sort of calendar of your clock, this can be done from the front (hand variety) or the rear (square or lunette variety). The calendar disc on the latter sort is attached to the back of the dial. You can move the square or lunette type from the front but you may leave finger prints to the dial, that will leave a mark over time. If the calendar does not want to move, wait for a few hours and try again, it may be in mesh. Generally the calendar can be moved by hand between 3 and 5pm each day.
4) Regulation:
If you notice a day after set-up the clock is running fast by a few minutes, the only thing that controls the timekeeping is the pendulum. (assuming the minute hand is not loose) Stop the clock by grabbing the pendulum and move the nut on bottom of the pendulum anti-clockwise, in effect lengthening the pendulum. Generally 1 turn either way would make the clock gain/lose 1 minute per day. Up= Faster, Down = Slower.
5) Striking:
If your clock is count wheel strike, occasionally the clocks strike may go out of sequence. This can happen if the clock has been left to run out. There is a lever on the movement which you can lift to adjust this. Alternatively if the clock is striking 4 but pointing to three and the time is 3.10 by the clock, move the clock hands past four quickly and on to five before the clock has finished striking five. The clock will now be in sequence again, striking five and pointing to five.
HUMIDITY
You should always keep your antique clock in R.H. 40-65%. Never keep your clock in dry or damp conditions. As a result of central heating over the last 20 years more damage has been done to antiques than at any time in the previous 300 years. Always check your humidity level. It is recommended in dry conditions you purchase a Humidifier or in damp conditions you purchase a DE-Humidifier.
WAXING
Always use a Beeswax polish every few years, never use spray polishes on antiques.
OILING
You should oil your clock movement every year or so with a specialist clock oil. This can be applied with an artists brush. Oil needs to be applied to the pivot holes on the front plate and backplate. (I.e. where the pinions of the wheels go through front and backplate) It is also advisable to oil the pallets and the pulleys that the weights hang on. You do not need to oil any of the gears in the movement. A few drops of oil should oil an entire movement, do not over oil as this will attract dust and cause wear.
SETTING UP YOUR LONGCASE CLOCK ON DELIVERY
Parts of a Longcase Clock:
1) Trunk
2) Hood
3) One / Two / or Three Weights
4) Pendulum
5) Movement
Tools Required to install your Longcase Clock and Fix it to a Wall
1) Drill
2)Wood baton (8inch * 2inch * thickness of skirting (generally 1inch thick)
3) Screwdriver and screw to screw clock into baton
4) 4/5 thin wooden packing blocks to straighten clock and make it lean against the wall
5) Raw plug and screw to fix baton to wall
Introduction
It is always advisable to fix your antique clock to the wall. If this is not done you run the risk of the clock being knocked over. Sometimes if the clock is not firm the clock may stop when the weights are level with the pendulum. The clock may rock slightly. You can avoid the fixing to the wall by just packing up the front feet up and thus throwing the clocks weight to the wall. This is done when you screw the clock to the wall in any case, but I would recommend fixing.
Process
The process outlined below appears very difficult but it is easily carried out by most people. If you do not wish to undertake this process, you can ask any joiner to do this for you. Let them have our instructions if they are unsure of the process.
The first step after unpacking the boxes that the clock is packed in, is to check the clock for any damage in transport. Inform your shipper if there is any. Hopefully this is not the case and you can continue with the fixing of your clock.
Location
Find the most suitable place you would like the clock to be. With the use of the thin packing blocks under the clocks front feet, place the trunk of the clock against the wall in this position.
The second step requires some assistance from a willing family member. Now you have set the trunk straight against the wall. (by eye is fine) Whilst one person takes the movement and places it on the cheeks of the case, the other person brings the pendulum. Do not leave the movement unattended on the cheeks. Keep your hand holding the clock until at least the pendulum is connected. Now thread the pendulum up though the crutch (the slot to the rear of the movement) and finally onto the back-cock of the movement.
Nearly there
Generally it is now safe, if the movement is far back on the cheeks, to let go of the movement. Do so carefully, making sure the movement does not overbalance.
At this stage put the hood onto the trunk and with your hands under the bottom of the seatboard. Lever the movement into the correct position in the mask, making sure the hood is still firmly back. The dial now should be fitting the mask evenly on both sides. At this stage you can carefully take the hood off and if applicable screw the movement down into the cheeks. It will then be stable and in the correct position. This is an optional stage of the process.
Fixing the clock to the Wall
Now comes the time for fixing the clock to the wall. If you do not wish to do this, all you need to do is hang the weights on the clock and follow the latter stages of the process.
Mark the wall through an existing central hole in the clocks backboard. (if there is one about chest height as you open the trunk door) If not drill a small hole through the clocks backboard at this point and mark. Temporarily at this height and to one side of the clock put the baton you are going to use just behind the clock. Leave it there sticking out from one side of the clock for the moment while you check the pendulum is free and not touching the backboard.
Wood Baton same size as skirting board
You have now checked the baton is of the correct thickness. If the pendulum is still touching the back of the clock while the baton is temporarily behind the clock and the movement is correct in the mask. (not been pushed back) use a slightly thicker baton and recheck.
Make sure clock is straight
Now you are happy with the thickness of the baton. Mark the position of where the clock is standing and move the clock to one side. (two people can lift the complete clock to one side or alternatively dismantle in the reverse order you set up). Make sure you know exactly where the clock was positioned. To one side of the mark you have on the wall Make sure you now test the wall so that there is no problem with drilling here. (no cables etc behind)\
Test the wall for cables
Drill the hole to one side of the mark you have made to the correct length of your raw plug. Attach raw plug and screw baton to wall. Re-assemble clock in exactly the original place. With exactly the correct number of packing pieces under the front feet. Screw through the hole in the clock’s backboard into the wood baton now fixed to the wall. Your clock is now secure.
You can now attach the clock weights and wind the clock. The clock should come to you unwound so on winding the lines should follow the grooves in the barrel (if present)
Swing the pendulum to start the clock
Now you can swing the pendulum and listen to the tick. The clock should tick evenly, I.e. tick, tock. Not tick, tooooooock. If the clock is straight and you are happy with this you need to adjust the beat. You will need to bend the crutch away from the sound of the long tock. If the clock is not in beat even if all the hands of the clock are free and not touching the dial or each other. TYe clock will stop within a few minutes. If the clock is in beat though and the clock stops at five past one for instance the hands may be touching. Gently ease them away from each other.
Relax
Now your clock is set-up you can now sit back and relax.
If you want to set the clock up in a corner position, it is basically the same process as above but you will need a T-shaped baton. The baton will be on the wall and you will have a baton on the back of the clock with a adjoining piece of wood connecting the two. The above process may seem complicated but it really is not. You should take no more than 20 minutes for a practical person or 45/50 minutes for fitting in a corner.
SET-UP SUMMARY SHEET
1) Decide where you want clock and fit a wooden baton to wall, similar thickness to skirting.
2) Place case in front of this and fix it to the piece of wood.
3) Place movement in case and get someone else to hang pendulum on whilst you steady movement.
4) Put the hood on and then slide you hand under seatboard to position in the dial in the mask correctly
5) Remove hood and attach weights correctly to pulleys.
Wind Up Clock Only Now
6) Carefully wind up clock making sure the lines are not twisted and winding evenly on barrels
7) Wind the clock to a point where the lines fill the barrel, do not over wind. Leave a gap of about 2inch between the underneath of the seatboard and the pulley.
8) Swing the pendulum gently and listen to see if the clock is in beat. Tick – Tock. If the sound is correct, set-up is complete, if not adjust beat of clock by bending crutch away from the sound of the long tock.
9) If the timekeeping is fast, adjust by lowering pendulum rating nut on bottom of pendulum. Roughly one turn down will make the clock go slower by one minute per day and vice versa
10) Always wind the weights before moving the hands of the clock.
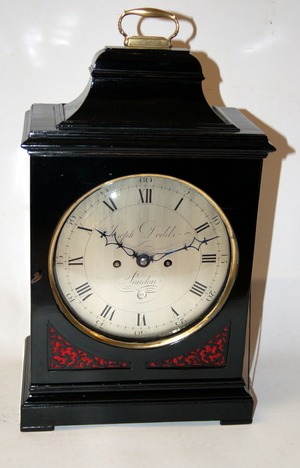
A fantastic size and design round silvered dial bracket clocks. 8 day duration twin fusee movement with calendar to dial centre. Joseph Dodds of London signed to dial. Lovely engraving to the backplate. Pull repeat on a single bell and the movement striking the hours. The design made famous by the King’s clockmaker John Ellicott. Only the finest makers produced clocks of this style. A wonderful collector’s clock.
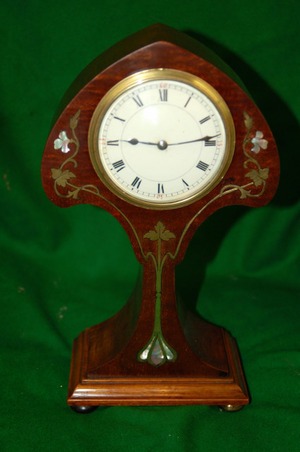
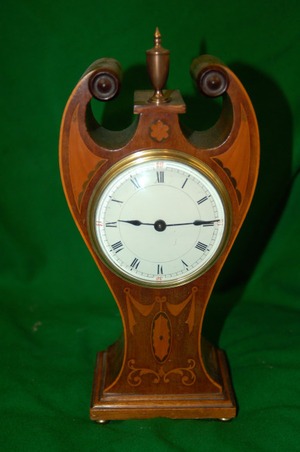
A nice mahogany and mother of pearl balloon clock featured here. Also with porcelain dial showing the time. Finally the 8 day movement with platform escapement.
A lovely swan neck pediment balloon clock. Together with Roman numerals to the porcelain dial. Finally a French timepiece movement of ‘8 day’ duration.
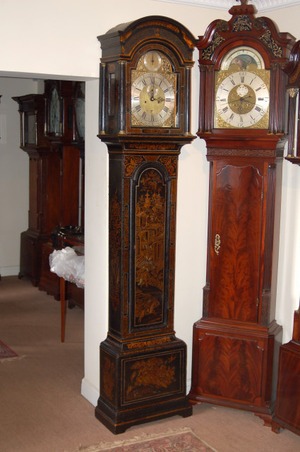
A good mid 18th century ‘8 day’ duration lacquer longcase clock. The arched brass dial by James Scholefield of London. The cabinet showing good Chinese scenes. Furthermore the dial with chapter ring and spandrels. Including seconds and calendar rings, matted centre and strike/silent to arch. Finally the 5 pillar movement striking hours on a single bell.