
A good quality 2 piece porcelain dial wall regulator. Also with month duration movement. Featuring the finest burr yew wood veneers. To sum up a fine high quality precision clock.
A good quality 2 piece porcelain dial wall regulator. Also with month duration movement. Featuring the finest burr yew wood veneers. To sum up a fine high quality precision clock.

A very elegant rosewood month duration Vienna wall clock. Probably one of the finest you will see of serpentine shape. Here a figure of eight design. Clearly lovely two piece porcelain dial. Also with ‘pie-crust’ brass bezel.
Benjamin Willoughby of Bristol 1700-65. Watches in the Ilbert and Dennison Collections. Showing here a month duration bell strike clock with brass dial. The dial featuring chapter ring and spandrels, finely matted and engraved dial centre. Ringed winding and calendar holes, spandrels to dial corners and engraved ‘wheat-ear’ decoration around the dial. Subsidiary seconds and calendar to the dial centre.
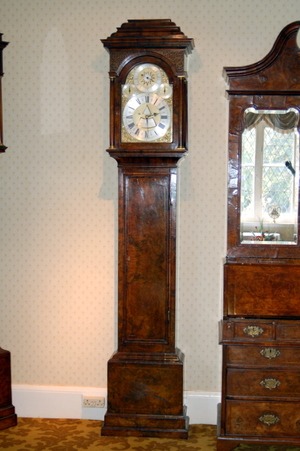
The outstanding quality walnut cabinet showing finely decorated marquetry case. Moulding and glass lentical to the trunk door.The cabinet standing on a single plinth. The case of superb colour and patination. A fine collector’s clock.
Congratulations on your purchase of a Longcase clock from Pendulum of Mayfair Ltd / Coppelia Antiques. Given proper care and conditions your Longcase clock should give many years reliable service.
’30Hr’ clocks are generally wound with a rope or chain. This should be done once per day.
‘8 Day’ clocks may either have one weight (typically regulator clocks) or two/three weights. All weights are to be wound by inserting the correct size of key on to the winding arbour. Your clock should arrive unwound, so on winding, the lines should follow the grooves in the barrel (if applicable) ‘8-day’ clocks are usually wound clockwise
‘Month’ duration clocks typically as above but since these clocks have an extra wheel in the train they are generally wound anti-clockwise.
When setting the time never move the hands backwards. If you move the clock hands backwards past a striking section you may cause damage to the movement. Always let the clock strike each hour/quarter etc when setting the time. It is also a good idea to wind the clock prior to setting the time and starting the clock.
As the clocks allow for 31 days per month, when there is less than 31 days, you need to adjust the calendar. Depending on the sort of calendar of your clock, this can be done from the front (hand variety) or the rear (square or lunette variety). The calendar disc on the latter sort is attached to the back of the dial. You can move the square or lunette type from the front but you may leave finger prints to the dial, that will leave a mark over time. If the calendar does not want to move, wait for a few hours and try again, it may be in mesh. Generally the calendar can be moved by hand between 3 and 5pm each day.
If you notice a day after set-up the clock is running fast by a few minutes, the only thing that controls the timekeeping is the pendulum. (assuming the minute hand is not loose) Stop the clock by grabbing the pendulum and move the nut on bottom of the pendulum anti-clockwise, in effect lengthening the pendulum. Generally 1 turn either way would make the clock gain/lose 1 minute per day. Up= Faster, Down = Slower.
If your clock is count wheel strike, occasionally the clocks strike may go out of sequence. This can happen if the clock has been left to run out. There is a lever on the movement which you can lift to adjust this. Alternatively if the clock is striking 4 but pointing to three and the time is 3.10 by the clock, move the clock hands past four quickly and on to five before the clock has finished striking five. The clock will now be in sequence again, striking five and pointing to five.
You should always keep your antique clock in R.H. 40-65%. Never keep your clock in dry or damp conditions. As a result of central heating over the last 20 years more damage has been done to antiques than at any time in the previous 300 years. Always check your humidity level. It is recommended in dry conditions you purchase a Humidifier or in damp conditions you purchase a DE-Humidifier.
Always use a Beeswax polish every few years, never use spray polishes on antiques.
You should oil your clock movement every year or so with a specialist clock oil. This can be applied with an artists brush. Oil needs to be applied to the pivot holes on the front plate and backplate. (I.e. where the pinions of the wheels go through front and backplate) It is also advisable to oil the pallets and the pulleys that the weights hang on. You do not need to oil any of the gears in the movement. A few drops of oil should oil an entire movement, do not over oil as this will attract dust and cause wear.
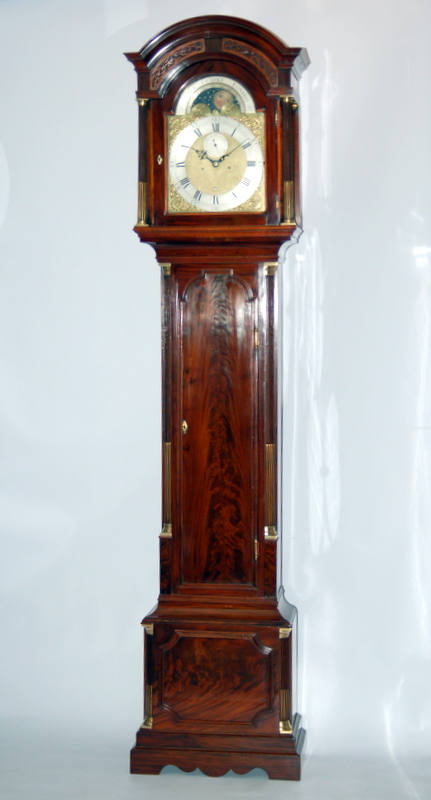
Parts of a Longcase Clock:
1) Trunk
2) Hood
3) One / Two / or Three Weights
4) Pendulum
5) Movement
1) Drill
2)Wood baton (8inch * 2inch * thickness of skirting (generally 1inch thick)
3) Screwdriver and screw to screw clock into baton
4) 4/5 thin wooden packing blocks to straighten clock and make it lean against the wall
5) Raw plug and screw to fix baton to wall
It is always advisable to fix your antique clock to the wall. If this is not done you run the risk of the clock being knocked over. Sometimes if the clock is not firm the clock may stop when the weights are level with the pendulum. The clock may rock slightly. You can avoid the fixing to the wall by just packing up the front feet up and thus throwing the clocks weight to the wall. This is done when you screw the clock to the wall in any case, but I would recommend fixing.
The process outlined below appears very difficult but it is easily carried out by most people. If you do not wish to undertake this process, you can ask any joiner to do this for you. Let them have our instructions if they are unsure of the process.
The first step after unpacking the boxes that the clock is packed in, is to check the clock for any damage in transport. Inform your shipper if there is any. Hopefully this is not the case and you can continue with the fixing of your clock.
Find the most suitable place you would like the clock to be. With the use of the thin packing blocks under the clocks front feet, place the trunk of the clock against the wall in this position.
The second step requires some assistance from a willing family member. Now you have set the trunk straight against the wall. (by eye is fine) Whilst one person takes the movement and places it on the cheeks of the case, the other person brings the pendulum. Do not leave the movement unattended on the cheeks. Keep your hand holding the clock until at least the pendulum is connected. Now thread the pendulum up though the crutch (the slot to the rear of the movement) and finally onto the back-cock of the movement.
Generally it is now safe, if the movement is far back on the cheeks, to let go of the movement. Do so carefully, making sure the movement does not overbalance.
At this stage put the hood onto the trunk and with your hands under the bottom of the seatboard. Lever the movement into the correct position in the mask, making sure the hood is still firmly back. The dial now should be fitting the mask evenly on both sides. At this stage you can carefully take the hood off and if applicable screw the movement down into the cheeks. It will then be stable and in the correct position. This is an optional stage of the process.
Now comes the time for fixing the clock to the wall. If you do not wish to do this, all you need to do is hang the weights on the clock and follow the latter stages of the process.
Mark the wall through an existing central hole in the clocks backboard. (if there is one about chest height as you open the trunk door) If not drill a small hole through the clocks backboard at this point and mark. Temporarily at this height and to one side of the clock put the baton you are going to use just behind the clock. Leave it there sticking out from one side of the clock for the moment while you check the pendulum is free and not touching the backboard.
You have now checked the baton is of the correct thickness. If the pendulum is still touching the back of the clock while the baton is temporarily behind the clock and the movement is correct in the mask. (not been pushed back) use a slightly thicker baton and recheck.
Now you are happy with the thickness of the baton. Mark the position of where the clock is standing and move the clock to one side. (two people can lift the complete clock to one side or alternatively dismantle in the reverse order you set up). Make sure you know exactly where the clock was positioned. To one side of the mark you have on the wall Make sure you now test the wall so that there is no problem with drilling here. (no cables etc behind)\
Drill the hole to one side of the mark you have made to the correct length of your raw plug. Attach raw plug and screw baton to wall. Re-assemble clock in exactly the original place. With exactly the correct number of packing pieces under the front feet. Screw through the hole in the clock’s backboard into the wood baton now fixed to the wall. Your clock is now secure.
You can now attach the clock weights and wind the clock. The clock should come to you unwound so on winding the lines should follow the grooves in the barrel (if present)
Now you can swing the pendulum and listen to the tick. The clock should tick evenly, I.e. tick, tock. Not tick, tooooooock. If the clock is straight and you are happy with this you need to adjust the beat. You will need to bend the crutch away from the sound of the long tock. If the clock is not in beat even if all the hands of the clock are free and not touching the dial or each other. TYe clock will stop within a few minutes. If the clock is in beat though and the clock stops at five past one for instance the hands may be touching. Gently ease them away from each other.
Now your clock is set-up you can now sit back and relax.
If you want to set the clock up in a corner position, it is basically the same process as above but you will need a T-shaped baton. The baton will be on the wall and you will have a baton on the back of the clock with a adjoining piece of wood connecting the two. The above process may seem complicated but it really is not. You should take no more than 20 minutes for a practical person or 45/50 minutes for fitting in a corner.
1) Decide where you want clock and fit a wooden baton to wall, similar thickness to skirting.
2) Place case in front of this and fix it to the piece of wood.
3) Place movement in case and get someone else to hang pendulum on whilst you steady movement.
4) Put the hood on and then slide you hand under seatboard to position in the dial in the mask correctly
5) Remove hood and attach weights correctly to pulleys.
6) Carefully wind up clock making sure the lines are not twisted and winding evenly on barrels
7) Wind the clock to a point where the lines fill the barrel, do not over wind. Leave a gap of about 2inch between the underneath of the seatboard and the pulley.
8) Swing the pendulum gently and listen to see if the clock is in beat. Tick – Tock. If the sound is correct, set-up is complete, if not adjust beat of clock by bending crutch away from the sound of the long tock.
9) If the timekeeping is fast, adjust by lowering pendulum rating nut on bottom of pendulum. Roughly one turn down will make the clock go slower by one minute per day and vice versa
10) Always wind the weights before moving the hands of the clock.
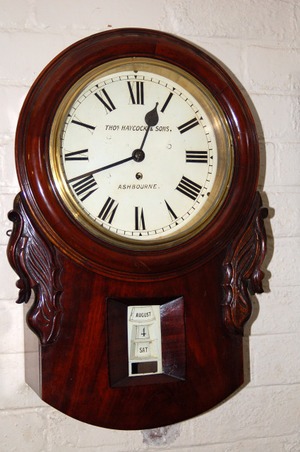
Rare Calendar Wall Clock by Thos Haycock & Sons – Ashbourne. ‘8-day’ fusee movement showing months, days and date.

EQUATION OF TIME – JOHN TOPPING C.1720
The clock featured here by John Topping is an extremely rare example of the ‘Equation of Time’ calculation. Shown here on an early 18th century Longcase Clock. It is pictured here purely for research within Wikipedia. In addition it is not for sale or any other commercial purposes. People can ask me questions relating to the ‘Equation of Time’ but the clock is not for sale.
We are all aware of the passage of time. Yet we can not see it. Many inventors have tried to measure time. But it was not until the invention of the pendulum that considerable increased the accuracy of clocks. That the calculation of the ‘Equation of Time’ became very relevant to clocks. Before the advent of the long pendulum in the early days. The clocks were very inaccurate and so calculating the difference between ‘solar’ and ‘our time’ would have been of little consequence.The long pendulum was first invented by Christian Huygens. A Dutch scientists in 1656.The oscillations of the pendulum reduced error to less than 1 minute per day. This eventually came to less than 10 seconds per day.
Peter Clare, a clockmaker in the 18th century, who worked in Manchester insisted his clocks were right and the Sun was wrong. A memorial to him reads.
Here’s the cottage of Peter, that cunning old fox. Who kept the sun right by the time of his clocks.
Many people might think Mr Clare’s observations foolhardy, but it would be folly to dismiss them.
The clock pictured here by a maker called John Topping of London. It is a superb month duration. Wwalnut Longcase clock with a dial showing the Equation of Time.With these increasingly more accurate clocks. The difference called the ‘Equation of Time’ became more relevant, and Mr Clare was right to some degree his clocks were more accurate than the sun.
The Equation of Time refers to the difference between the suns time and that shown by the clock. This varies by up to 16 minutes per day during the year. Only on four days in the year is there no difference between the suns time and the time shown by clocks. The days on which the clock and the sun should usually agree are: the 15th of April, 15th of june, 31st of August, and the 24th of December.
Effectively Peters Clare’s clocks were more accurate than the sun. Clearly this is a result of the elliptical rotation of our planet.
The clock by Topping shown below is one of the few clocks ever made showing this calculation on a year calendar. It lets the operator know just how many minutes less or more the clocks time is from the suns time. Effectively making it easy to set your clock in the 18th century by means of a sun dial.
This clock also has the special feature of a spherical moon. Also showing the true shape of the moon. In addition this is accompanied with a tidal times indicator. Also rise and fall of the pendulum. Thus making for changes of seconds to the timekeeping. It is housed in a superb elegant burr walnut cabinet.
Very few clock makers ever had the talent to make such complex clocks. Only the finest clockmakers have examples to their work. These are very few and far between. Thomas Tompion I believe made 3 equation clocks. Topping as listed here made a few, Williamson, who made several equation clocks for Quarre and the maker Gregg.Clearly very few are still surviving today. The complexity of the movement is mind blowing. To sum up a very rare and interesting clock.
‘Equation of Time’ year calendar clock. Featuring the finest quality movement by John Topping of London. Also with superb London burr walnut figured cabinet. Showing high quality London features. The complex month duration movement with chapter ring and spandrels. Additionally unusual large seconds to the arch. Year calendar with equation of time calculations to the engraved silvered dial.
Lovely quality finely matted centre. also with rise and fall of pendulum dial and strike/silent dials to the arch. Amazing movement design striking the hours on a single bell.

A while back now I wrote a blog about moon-phase antique clocks. We restored this superb antique grandfather clock by James Clarke of London. I thought it was important to write a little more. More about London mahogany moon-phase clocks in particular and why they are so rare and sought after.

This clock above is a simply beautiful example of a London moon-phase clock. You will notice the high quality matted centre to the cast brass dial. Chapter ring and spandrels and subsidiary calendar. Recessed seconds feature and lovely engraving to the moon discs to the arch. The name is prominently engraved to the cartouche around the arch. It has beautiful painted moon disc and a special extra feature of strike/silent lever to the three o’clock position on the dial.
The picture above shows the beautiful workings of this James Clarke 8 day antique clock. You will notice one large extending piece of brass for the front plate top. This is so that the dial feet can miss the moon disc. Lovely high quality 5 pillar London movement, all now beautifully restored back to showroom condition.
I will now return to why so few London clocks have moon features.
I suppose there are two main reasons. The first reason which is an important point to start from is the size of the London dials. Provincial 12 inch dials tend to be 17 inches high which would allow for a full semi circle to the arch. Easily enough space for a feature like a rotating moon disc. On a London clock the height is 1 inch less. That means on a 12 inch wide dial, the height of the dial is only 16 inches. The space to the arch is now no longer a full semi-circle and far more restricting. On the dial above you will notice the arch is not a semi-circle. The cartouche around the arch tapers to the centre.
The second reason is centred around the fact that London is London. Trading in the UK outside London was not really required back then There were plenty of wealthy clients in and around London. Moons generally were required to check when to travel. Generally merchants would travel on and around full moons, so the risk of the Highwayman was not so great. Clearly some clocks like those with high tide, will also occur sometimes with moons.
Knowing when your high tide in your local port like London bridge was also important for the merchants. Travelling around London with the fact they had good street lighting fired by oil lamps after 1750 was not so hazardous. Knowing when the next full moon was, was not really as important.
As discussed in my other blog about moon phase clocks, there were lots of different types of moon. It is the rolling moon like that on the James Clarke clock that was the most popular. Two moons appear on these discs, but only one can be visible at any one time. Generally on London clocks the moon is accompanied by a starry sky rather than country scenes on provincial clocks.
There are, as previously discussed, 29 and a half days in a lunar month. We divide up the 12 months into either 31, 30,29 or 28 days to compensate. The exact lunar cycle is 29 days, 12 hours, 44 minutes and 2.8 seconds I believe, I hope my memory is right ! The clocks moon as it is 29 and a half days and is therefore fairly accurate, once set !
The James Clarke antique grandfather clock picture above shows what a top quality clock should look like. The dial and movement show amazing high quality features and detailing. The case shows only the finest London case making features of the late 18th century. Quarter columns and brass capitals to the base. Moulding to bridge top door and base and 2 plinths are but some of these lovely features. To view this clock please visit our shop in London, Pendulum of Mayfair or contact us through our website https://www.pendulumofmayfair.co.uk . James Clarke is listed as working in Newgate Street, London and was apprentice in 1760 and a member of the Clockmakers Company from 1768-78.
Daniel R Clements
#SBS Theo Paphitis Winner August 2014 : Antique Clocks Twitter
Antique grandfather clocks tend to be weight driven and go for a specific amount of time on a wind. I will cover the standard examples in this blog. For examples of different types of grandfather clocks please visit our grandfather clock stock page by clicking this link: Antique Clocks For Sale.
The most basic of antique grandfather clocks is the simple 30 hour duration antique grandfather clock. These were made generally for simple cottages in the country. They have simple mechanisms with one weight that drives both the striking mechanism and the going side mechanism of the clock. Since the weight drives both sides of the clock is has more work to do and thus it winds out far quicker. The weight is normally about 8lbs in weight driving this clock.

Bowfield of Melton Antique Grandfather Clock.
The most standard of all antique grandfather clocks is the ‘8-day’ grandfather clock. These clocks have a movement split into two separate sides. One weight driving each side. There is a striking side weight and a going side weight. Each weight has its own separate job to do. The movements tend to be 4 wheel train and the weight of the weight is usually around 13lb each. Sometimes higher quality movements run on a slightly smaller weight, as there is less friction involved. An example of a standard ‘8-day’ grandfather clock is found below.

Henry Jenkins Grandfather Clock C1770
We are now moving into the realms of the rarer clocks. Every so often you come across a month duration or maybe a 3 or 6 month duration grandfather clock. Months duration grandfather clocks have like the ‘8-day’ grandfather clocks two trains for the mechanism. Usually one weight for the striking side and one for the going side. The movements tend to be 5 wheel trains and tend to wind anti-clockwise. The driving force tends to increase dramatically as well. The weights tend to be around 30lbs in weight each one. That is over the double the weight of an ‘8-day’ example. A lovely month clock can be found below.
One important point to note is as the duration of the clock increases the structure of the case gets more robust. This is required to cope with this extra weight. The sides of the case get thicker and construction gets all round slightly better to cope. A month case should be heavier than the equivalent ‘8-day’ example.

Finally on very rare occasions you will find year duration antique grandfather clocks. We have only ever owned a handful of these very rare clocks. Some examples use the power from two weights to drive the clock. Alot of power is required to keep the clock running. You can also find some examples that will strike. These are generally on the earlier examples. The later Georgian examples tend to more about timekeeping and precision movements. Weights are very heavy in these clocks. Generally they need steel cable to support the weights. Each weight can be over 60lb. A minimum of 6 wheel train and high pinion counts are found of these types of grandfather clock. Clearly only the top makers produced such clocks.
Daniel Clements
Follow my Antique Clock Tweets on Twitter
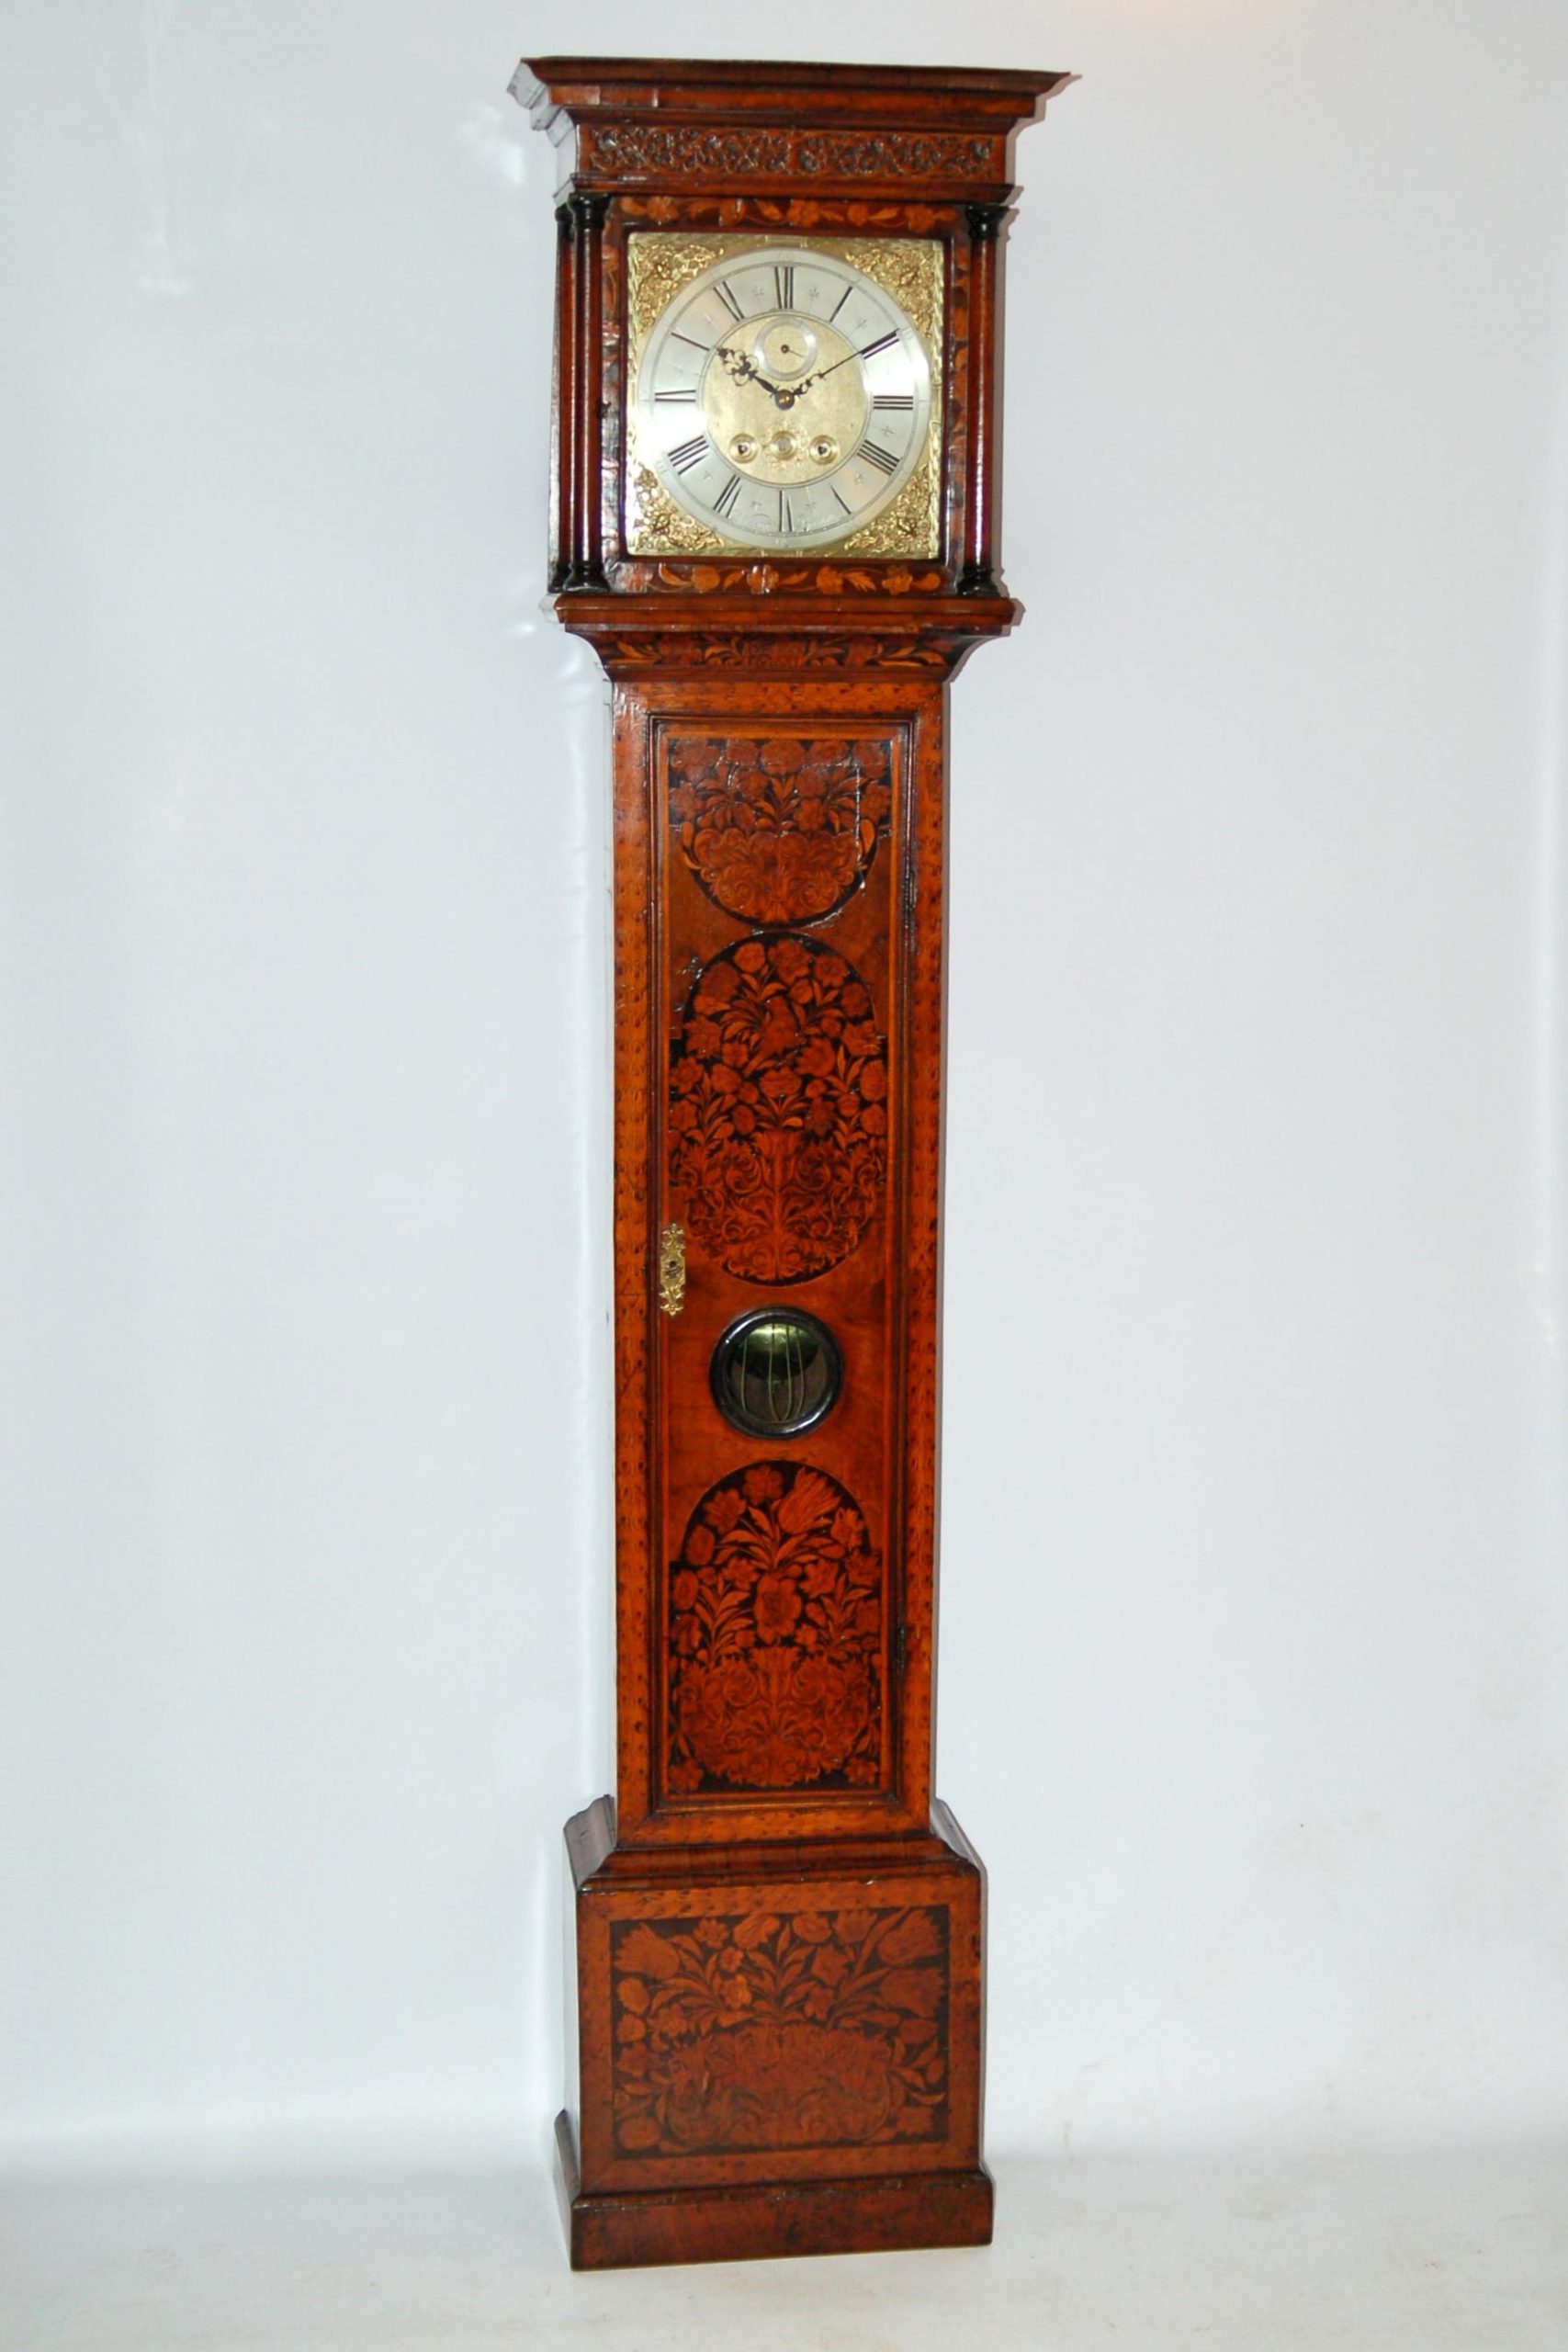
I have had the pleasure to come across this amazing early 18th century ‘equation of time’ clock by John Topping of London. John Topping is not a household name in today’s clock world but he really should be. He built some of the most fantastic complex antique clocks during his time working in London.
He started as an apprentice to William Grimes in 1691 and he worked up until his death in 1747. He always described himself as ‘Memory Master’. I am not sure if this was a honour bestowed on him or if it was like a sales and marketing slogan. Either way he produced some exceptional clocks.
Further details of month duration ‘Equation of Time’ John Topping Clock.

The clock above is a fine example by John Topping. A superb early 18th century antique clock manufacturer in London. It is a most desirable combination of a superb and interesting complex movement and a beautiful veneered walnut cabinet. The dial is 12 inch and is signed to a recessed triangular sector, ‘John Topping Memory Master.’ The dial is of a specific elongated dimension to fit the extra large seconds. The rise and fall of pendulum and strike/silent dials is to the arch.

If you continue down from where the makers name is signed and above the six o’clock position on the dial, you will see a revolving year calendar. On this year calendar there is an equation table allowing you to set ‘true time’ in the 18th century. I will come to what ‘true time’ is later in this piece. The top line of this year calendar is engraved ‘Sun Slower’ or ‘Sun Faster’. The next line gives the months divided into days which are numbered 5,15 etc for each month. The equation and calendar dial is set by a winding square next to the 60 and midday position on the clock.

You will notice that the winding holes are located above the centre position rather than below centre on most clocks This allows enough room for the equation of time year calendar ring. The thin blued iron strip marks the day of the mont. Then so many minutes faster or slower than a sundial can be read off for calculating actual time. The dial has superbly matted centre, chapter ring, specifically made spandrels and engraving to small sections within the arch.
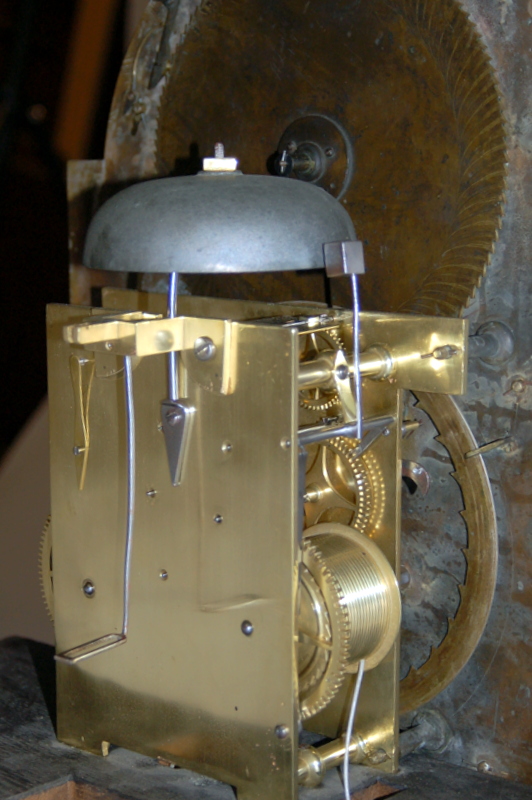
The seconds feature to the arch is large which is a really nice feature. It also has a sunburst feature cut in the dial to the top centre section. A superbly laid out and designed dial by this wonderful clockmaker. In the picture below you will see how complex the movement requires to be in developing a dial like this.

The movement has a brass centre section and two side sections. From the picture above you can see the cam which lifts and lowers the pendulum for small adjustments to time. You can also see the many pillars used in this high quality movement.

The table above was sometimes pasted inside some special London clocks when they did not have a proper year calendar. Owners could work out the calculation manually. Clearly full year calendar equation clocks are exceedingly rare. Most likely these cost huge amounts of money. As such probably only a very small amount of these clocks were ever manufactured.
So what is ‘true time’ then ? In the 18th century finding out what midday was was relatively easy, a sundial could be used. The problem comes as this is not ‘actual time.’ As a result of the elliptical rotation of the earth. Clocks were sometimes slower or sometimes ahead of this sundial time. A good explanation and for the science minded of us can be found on the Wikpedia Equation of Time Page.
Daniel Clements
Follow my antique clock tweets.